Flatten the curve (bird)

[ezcol_1fifth]-[/ezcol_1fifth] [ezcol_3fifth]
” In this climate where any certainty is elusive at best, I can promise you this… “
I’ve always been an avid campaigner in the flattening of a bird, a process of turning this hopelessly 3-dimensional animal that insists on uneven heat distribution, into a 2-dimensional disk that crisp up indiscriminately across the plane. Without the technicality of deboning the entire chicken and armed with only a single kitchen shears and a flat skillet, I’m going to show you how to easily de-joint and de-scaffold a bird so that it can achieve an unequivocally crispy and blistered skin-cap on one side, and slow-cooked therefore succulent and unbelievably juicy meat (even the breasts!) on the other. In this climate where any certainty is elusive at best, I can at the very least, promise you that you’ll never want to roast another bird after this.
[/ezcol_3fifth] [ezcol_1fifth_end][/ezcol_1fifth_end]
[ezcol_1third]

STEP 1: You’ll be able to finish this entire process with a kitchen shears. Remove the wing tips and place the bird with the backbone/spine facing the counter. Then cut through the breast bone to open the bird up.
[/ezcol_1third] [ezcol_1third]

STEP 2: Flip the bird over with the skin-side up, then bend and snap/dislocate the joints that connects the thighs to the backbone/spine by bending the thighs 90 degrees upward. Flip the bird back now with the skin-side down. With a kitchen shear, completely cut through the joints that connects the wings to the breast (but have them still attached), then remove the triangular breast-bone as seen in this photo.
[/ezcol_1third] [ezcol_1third_end]

STEP 3: To further flatten the bird, cut along the rib cage to separate it from the backbone/spine, then cut through it again somewhere around the mid-point to flatten the natural curvature of the rib cage. Also cut through the wishbones that connects the shoulder and breast to the rib cage. Don’t worry, there’s no strict technicality here. The rule of thumb is disconnect every single joints that holds the bird in shape so that it can be completely opened up and flattened.
[/ezcol_1third_end]
[ezcol_1third]

STEP 4: Now cut through the joints that connects the drumstick to the thighs, and the joints that connects the thigh to the backbone/spine. Then cut open the meat on the drumsticks and thighs to completely open it up and expose the bones like this.
[/ezcol_1third] [ezcol_1third]

STEP 5: Finally, cut alongside the meat that is attached to the pelvic bones to further open and flatten the hip area. Cut and remove the two pointy tips of the pelvic bones. At this point, the entire surface of the skins should be able to lay completely flat without curves.
[/ezcol_1third] [ezcol_1third_end]

STEP 6: Lay the bird meat-side up first and evenly sprinkle 3/4 of the dry seasoning on top. Flip it over with the skin-side up, and sprinkle the rest of the seasoning evenly over the skins. UNCOVERED, let the bird marinate in the fridge for at least two hours, or 6~8 hours.
[/ezcol_1third_end]
[ezcol_1half] [/ezcol_1half] [ezcol_1half_end]
 [/ezcol_1half_end]
[ezcol_1half] [/ezcol_1half] [ezcol_1half_end]
 [/ezcol_1half_end]

Ingredients
- 1 chicken (mine is about 3 lbs), see note*
- 2 1/2 tsp fine sea salt
- 3/4 tsp ground white pepper
- 3/4 tsp ground black pepper
- 1/4 tsp ground galangal, optional
- 3~4 cloves of garlics, smashed and peeled
- 4 sprigs of fresh thyme, or rosemary, or other herbs of your choosing
Instructions
- Flatten and marinate the bird according to the instructions in the photos.
- In a cold, large, flat, non-stick skillet that will fit the entire spread out chicken, lay the chicken with its skin-side down and make sure the skins are spread out without folds, no oil needed. Set the skillet on medium-low heat (on a scale of 1 to 10, I would say a 3.5) over a burner that is wide instead of focused in the center, then partially cover the skillet with a lid.
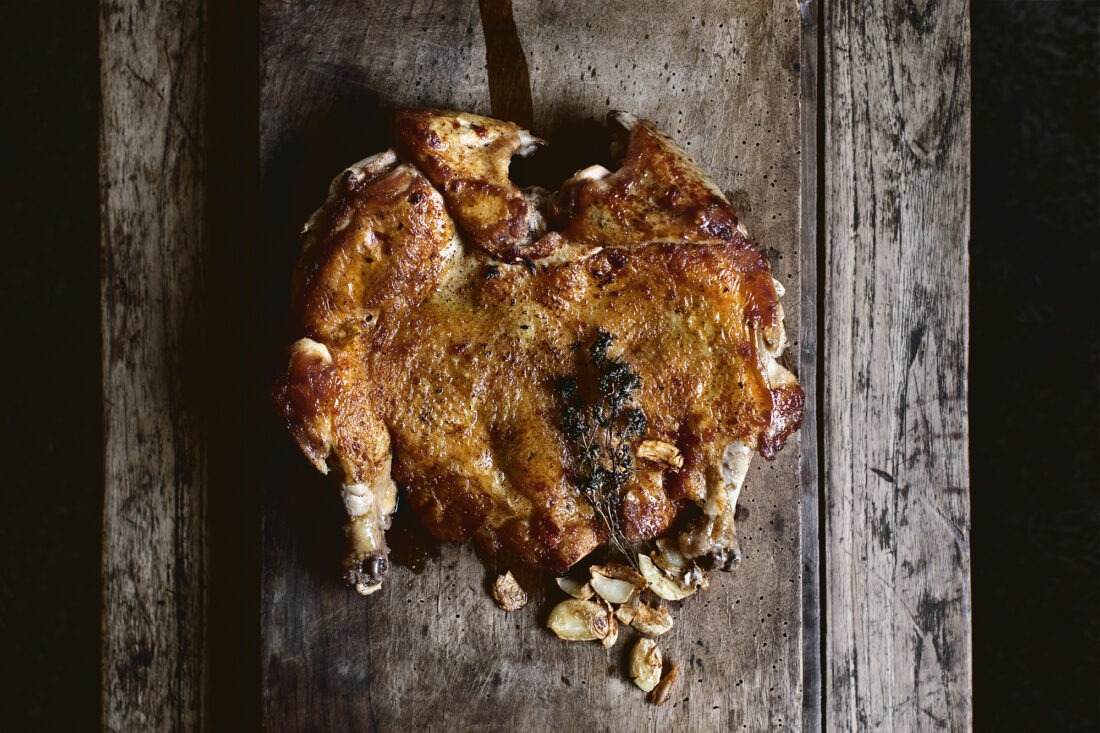
- The skin will slowly render down and crisp up, resulting in the chicken eventually cooking in its own fat. It won't need much baby-sitting and should take about 25~28 minutes for the skin to become evenly golden browned, blistered and crispy. If not, turn up the heat a bit in the end to achieve this. In the last five minutes, add the garlics and thyme to infuse the oil which flavor the chicken as well. When the skin-side is fully crisped up, the meat side should be about 50~60% cooked through, looking slightly opaque.
- Now flip the chicken over and cook the meat-side for another 3 minutes. If your chicken is a lot bigger than 3 lbs, you may need a bit more time. But catching the sweet spot when the meat is JUST cooked through but not a minute longer, is paramount in its final juiciness and succulence.
- Rest the chicken a couple minutes and serve. Do not forgo the extremely flavorful but often overlooked meats along the backbone, collecting deliciousness from the neck meats down the oysters by the thigh area and a strip of crispy skin on the entire runway.
Notes
* My chicken is relatively small, about 3 lbs. You can certainly use larger chicken but adjust the amount of seasoning according. * Avoid any garlic or onion powder in the seasoning that will burn easily and become sticky. Keep the seasonings simple with salt and pepper, and introduce other aromatics later on in the cooking process.
SUBSCRIBE TO GET NEW RECIPE NOTICES:
mikes
April 23, 2020 at 9:48 PMThe *cold* pan method has been a revelation for myself. I cannot believe how only yourself and, I think, one other site has ever offered this advice in my travels. All these “hot pan to crisp” methods all stink.
betty lee
April 24, 2020 at 12:12 AMHi Mandy.
Your other deboned chicken recipe remains one of our favorites and is in constant rotation.
Do you marinade this overnight?
Do you let the chicken thaw to room temp before cooking?
betty lee
April 24, 2020 at 12:17 AMApologies, just saw the marinade time in the deboning instructions.
mandy@ladyandpups
April 24, 2020 at 1:46 AMGreat!
Sam
April 24, 2020 at 12:16 AMThis looks so deliciously crispy and something I want to try.
Peachbunny
April 24, 2020 at 10:23 AMThis looks unbelievable! Every recipe my husband and I make of yours is a revelation. Your inconvenient ragu-eth is the Only way I ever make bolognese these days. And your hot bunny sauce was pure whimsical magic. I have just one question- would a cast iron work here in place of the nonstick skillet? It’s what I usually cook with but if it just won’t do then we’ll just have to invest in some nonstick :)
mandy@ladyandpups
April 24, 2020 at 2:37 PMPeachbunny, of course, as long as it is wide enough to fit the flattened bird :)
Nico
April 26, 2020 at 3:38 PMThe genius of this recipe is not only the end result, but its simplicity. I added juice of half lemon during the 2 hour marinade to the meat side (I think it helps texture of the chicken) and put a small amount of Tio Pepe (very dry sherry) in the pan after removing the chicken to get all the fond into a sauce. Really outstanding. One of the best chickens ever. As for this: “…you’ll never want to roast another bird after this.” I think you’re right.
Poppy
May 19, 2020 at 4:18 PMI cooked this tonight in a stainless steel skillet and it’s sticking. What did I do incorrectly ?
mandy@ladyandpups
May 19, 2020 at 7:27 PMPoppy, as stated in the instructions, the skillet has to be non-stick :)
Poppy
May 21, 2020 at 8:05 PMOh how did I miss that ! Thanks
Jessie-Sierra
April 29, 2020 at 10:16 PMThis is a spectacular & informative post! I’ve never seen the process described so sensibly. All of that crispy chicken skin is leaving me drooling!
Will
May 5, 2020 at 6:47 AMI was really excited about this recipe, but had a few problems. I used a cast iron pan, and after soon after the skin began to brown, the chicken seemed to release a lot of moisture. It was boiling around the sides. I flipped it and poured out a lot of the liquid. Then, hoping to get more crisp, I flipped it back onto the skin and raised the heat. Probably a mistake, because it then stuck to the pan. In the end, it was delicious, but there was no crisp.
My thoughts are this. Maybe more time in the fridge to dry out? I did 2 hours. Maybe some chickens contain more water? This was a commercial organic bird.
Next time I will try marinating longer. Also, I will try a nice local chicken, which in the past I have noticed seem to have less excess moisture. And maybe a stainless steel pan?
mandy@ladyandpups
May 5, 2020 at 1:41 PMWill, was your pan big enough to fit the chicken spread out flat? Crowding will encourage too much moisture to gather. Ive never heard of chicken emitting this much liquid before. Perhaps try a diff chicken next time?
mandy@ladyandpups
May 5, 2020 at 1:42 PMAnd skillet best be non-stick.
Will
May 5, 2020 at 7:31 PMThanks! I did forget to mention it was a 10 inch cast iron with a 3.6 pound bird. Probably was too crowded. I should have used the 12 inch cast iron or 12 inch stainless, which are my only other options. We will try again soon!
Clarissa Rossi
August 18, 2020 at 7:29 AMI was excited to try this technique! Unfortunately, I may have ‘flattened’ the chicken too much…if that’s possible…lol. When I tried to flip it, both breasts-wing sides separated from the rest of the chicken, resulting in 3 large pieces. I also thought my staub pan was nonstick, alas, it was not. I can’t wait to try your method again, with the benefit of my failed experience. Thanks for this recipe!
betty lee
August 18, 2020 at 8:06 AMHi.
I used my staub pan too because it’s the only one that’s big enough. I put a little oil on the bottom to alleviate the sticking and it helped a lot. :)
JKL
August 27, 2020 at 9:41 AMI have made this chicken multiple times since you first posted this in April. In 30 years of marriage my husband has never eaten chicken skin, until this recipe. Love that I don’t have to heat up and oven in 39C degree summer heat and that it’s done in 30 to 35 minutes. Of course to please Dear Husband I upped the number of garlic cloves thrown into the pan. Thanks for a fabulously delicious and easy recipe.
Michelle
November 12, 2020 at 12:15 AMI can’t wait to try this recipe, it looks fantastic! I was hoping you would consider adding a link for the kitchen shears you use? I’ve got a pretty good pair but would like a larger size like you’re using. Thanks!
mandy@ladyandpups
November 12, 2020 at 1:10 AMMichelle, IT was a no-name brand scissor I fought at local general store.
Brandi
November 19, 2020 at 10:11 AMMy chicken did not look anything like yours – not as brown or crispy. I used a ceramic non- stick. Does that make a difference?
mandy@ladyandpups
November 19, 2020 at 2:07 PMBrandi, I honestly have no idea why. Ceramic non-stick is fine as long as it’s big enough. But it seems that induction stove requires higher heat than gas.
Brittany
November 22, 2020 at 10:52 AMThis looks delicious! As a crispy chicken skin lover who finds herself cooking for one on Thanksgiving, I’m wondering if this would work with a couple of skin-on thighs. Or would you recommend another cut if someone wanted to do a single portion?
mandy@ladyandpups
November 22, 2020 at 1:37 PMBrittany, you can do it on a whole leg (thigh + drumstick) :)
Marion Jacobson
November 24, 2020 at 9:21 AMCan this be done in a cast iron pan that is properly seasoned?
mandy@ladyandpups
November 24, 2020 at 1:58 PMMarion, yes but it has to be big enough.
Damon
November 26, 2020 at 2:43 AMHi Mandy, I’m thinking of doing this with a turkey over wood on a great big plancha. The turkey will have room to lay flat, but the plancha won’t have the deep sides that a frying pan would. How important is it for the rendered fat to be so (relatively) deep?
mandy@ladyandpups
November 26, 2020 at 1:56 PMDamon, well the fat is awfully nice for gravy and roasted veggie but of course if you can’t save it, that’s fine. But note that you won’t have enough fat to force the aroma out of fresh thymes and garlic.
Uyen
December 3, 2020 at 5:18 AMThanks for the recipe! I tried it the other night and to the disbelief of my sister and her husband (he wanted to order McD when i said i was cooking!!), it was a succulent!
I cannot wait to try your other recipes!
Michi
December 18, 2020 at 8:59 AMI should have read the comments earlier and realised that someone else had tried to do this with a stainless steel skillet with little success but alas, that’s all I had that would fit my bird. So, if you are also wondering if stainless steel will work, it will not. However, it was still so freaking delicious that I am still thinking about the leftovers sitting in my fridge. I had no idea that just salt, white pepper and black pepper would make such a delicious tasting bird, but of course I knew Mandy would not steer me wrong. I will have to bite the bullet, season my cast iron pan and try it again in my cast iron because I am having dreams of eating this delicious chicken with actually crispy skin. My husband actually even stood by the pan, painstakingly picking the stuck on pieces of chicken skin for us to eat because it was so good.
mandy@ladyandpups
December 18, 2020 at 2:28 PMMichi, yes it has to be non-stick skillet. Even cast iron may stick I have to warn you :)
Kristen
February 19, 2021 at 5:25 AMI did this recipe using chicken thighs only – it was what I had on hand, and took just a few minutes to flatten it per above. On a non-stick pan, 15 min on medium low, then another 2 min on high (to get the crackling skin effect), and then 3 min turned over. Didn’t have any thyme, and worked great with a few smashed garlic cloves. Fantastic chicken fry method, can be adapted very easily with different cuts of chicken/ herbs on hand. Will be making this very often! Thanks for the recipe!
miri
June 15, 2021 at 11:26 PMand running to buy huge non stick skillet now…
Pickyeeee
August 24, 2023 at 5:43 AMI usually salt(Diamond crystal kosher brand) the living life out of my chicken, fit a wired cookie rack in a baking sheet to create airflow, place chicken on rack skin side up and leave in fridge overnight. It eliminates all moisture from skin which results in extreme crispy skin and creates a dry brine for extra juicy meat. I’ve also noticed that if your chicken isn’t air-chilled it results in wetter meat. Three years later, but hopefully this helps.
Monet
September 10, 2023 at 1:15 PMI made this last night. It was sooooo good!
What a revelation!